Chaos Critters Tech Support: CapCut Video Editing Part 2
Surprising serrano peppers appear in this week's post. And I have the second CapCut video where we cover Auto Reframe, Zoom, and Voiceover. And more puppy pictures!
Pleasant Surprises
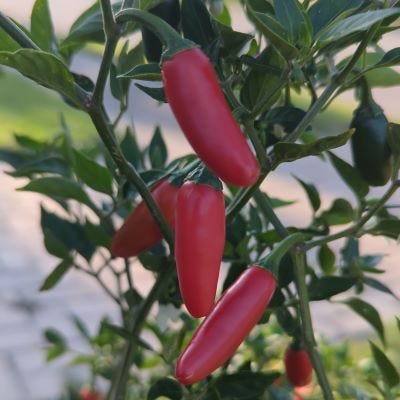
Tod here again this week. Over the last couple of years, I’ve been trying to grow serrano peppers or jalapeños. I’ve gotten plants to grow - and we’ve got one in back that has been there for six months or so. However, I got a pleasant surprise when I checked on a rosebush out front recently. Anna has been a little busy and hadn’t pruned the roses recently… There’s a mature serrano bush sharing the barrel with the rose.
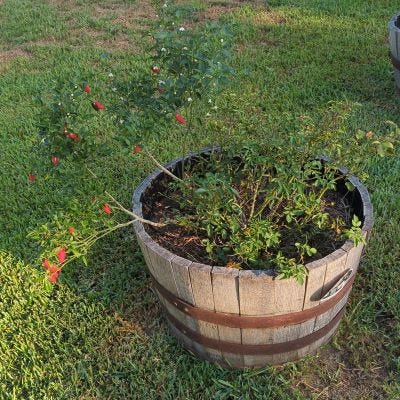
When soil from a collapsed raise bed got moved to a rose barrel, some serrano seeds went with it. I’ve gotten a handful of tasty and hot peppers from the soon-to-be-relocated serrano plant.
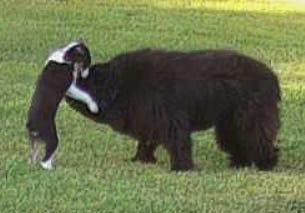
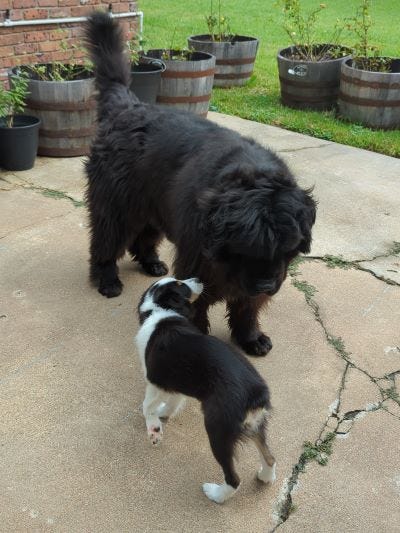
In other exciting news, Dante and Crokell have adapted to playing with each other very quickly. Surveillance video shows them to be pretty well behaved. (Actual surveillance video shown below.) Crokell using his nose to keep the puppy in line, or rolling on the ground with him. (More puppy pictures at the bottom.)
Since this week has been full of pleasant surprises. This week’s question: what’s your recent pleasant surprise? Or your favorite pleasant surprise?
Auto Reframe
Last week, we looked at Camera Tracking, which uses AI to follow a target on the screen. This week, we’re going to look at Auto Reframe. Auto Reframe (AR) is primarily designed to let you resize the video to whatever size a particular platform requires. The nice thing is that is also tries to center the action. AR is not as good as Camera Tracking at following the action, but it most cases it is good enough. Also, it’s a lot simpler.
So, using the instructions from last week ( https://blog.casasent.blog/p/chaos-critters-tech-support-capcut ), let’s load a new project and video. This week’s video is Crokell’s first Rally Novice run at NRG back in July.
Here, I selected Auto reframe and then set the Aspect ratio to 1:1. I like 4:3 or 1:1 since it makes the video a lot smaller. Once you select the aspect ratio, CapCut immediately shows the live aspect ratio and starts interpreting. You can watch as it progresses, to see if you like how it is working.
Once the AR is done, hit Apply to accept the changes.
Notice that while the action area is now a square, the video itself still have the original Aspect Ratio.
Change Aspect Ratio
To change the aspect ratio for the entire video, click on the Ratio button on the video preview panel. You’ll get a popup with a bunch of options - here, we select 1:1 at the bottom.
Now, we no longer have the dark black letterbox bands on each side of the video.
Zoom In
Now, since the video is not done real close, we can zoom in a bit.
In the Video Panel, under Basic, I click the diamond to the right of "Scale”. The tooltip for the diamond says “Add keyframe”. This lets us have multiple scales. Change the Scale value from 100% to 150%. Dragging the current frame bar back and forth in the bottom panel lets us quickly check if 150% works. It works pretty good.
But, what if we want to zoom in extra on one part? Like where they do the figure eight?
First, we set the frame selector to the just before we want to zoom. Click the Add keyframe diamond but do not change the scale yet. Move forward a bit and add a new keyframe and then change the scale to 250%. CapCut will zoom in between the two keyframes. And at the end, we make two more keyframes, with the last one being set to 150%. So you end up with five keyframes: one at the front, a pair going from 150% to 250%, and a final pair going from 250% to 150%.
Remove Audio
Now we want to remove audio, since the audio for this video is not appropriate. Right click on the video in the bottom panel and select Extract Audio.
CapCut will move the audio to a separate track. Right click on that track and select Delete.
Now we have a silent movie. (Too bad it isn’t black and white! ~Anna)
More Sound!
So, using the instructions from last week ( https://blog.casasent.blog/p/chaos-critters-tech-support-capcut ), select and add some background music. Although, I used the AI Music option. I also added titles, as described last week.
I set the volume for each of the three songs I used to -24 dB, since this is background music.
Now we want a voiceover. Move the frame select to the beginning of the video and click the microphone (circled in blue) at the top right of the bottom panel. This brings up the Voiceover dialog.
At this point, I turn down the volume in my headset, as I cannot talk and listen to the video at the same time. Click the big red record button at the top and start talking. It often helps to plan a script ahead of time.
Once you’re done, you can use the Split button to cut and trim the voiceover if needed.
Export
Export as described last week, and you have your video!
Tip of the Week
Pack a jar of peanut butter; it’s the ultimate survival food and can double as a sticky trap for pesky extraterrestrials.
Also, you can share it with your unexpected brother! (Six month old serrano that hasn’t produced surprisingly in the upper left.)
And their sister Aki makes a surprising visit!
Writing News
I finished the first draft of a novel last week at approximately 20,000 words. Anna is going to expand it to 65,000 words. (I guess it should be called a novella.)
Also, we submitted a 1000 word story to a young kids magazine!
Have fun and keep the peanut butter handy!
~Tod and Anna
Thanks for the training, Tod, Anna. Love the photos of the pups, too. And good luck with your submission. 🤞